Intro
- What is Vim?
- The Vim Philosophy
- First steps
- Minimal vimrc
- What kind of Vim am I running?
- Cheatsheets
Basics
- Buffers, windows, tabs
- Active, loaded, listed, named buffers
- Argument list
- Mappings
- Mapleader
- Registers
- Ranges
- Marks
- Completion
- Motions, operators, text objects
- Autocmds
- Changelist, jumplist
- Undo tree
- Quickfix and location lists
- Macros
- Colorschemes
- Folding
- Sessions
- Locality
Usage
- Getting help offline
- Getting help offline (alternative)
- Getting help online
- Autocmds in practice
- Clipboard
- Restore cursor position when opening file
- Temporary files
- Editing remote files
- Managing plugins
- Block insert
- Running external programs and using filters
- Cscope
- MatchIt
- True colors
Tips
- Go to other end of selected text
- Saner behavior of n and N
- Saner command-line history
- Saner CTRL-L
- Disable audible and visual bells
- Quickly move current line
- Quickly add empty lines
- Quickly edit your macros
- Quickly jump to header or source file
- Quickly change font size in GUI
- Change cursor style dependent on mode
- Don’t lose selection when shifting sidewards
- Reload a file on saving
- Smarter cursorline
- Faster keyword completion
- Cosmetic changes to colorschemes
Commands
- :global and :vglobal - Execute a command on all matching lines.
- :normal and :execute - The scripting dream team.
- :redir and execute() - Capture command output.
Debugging
- General tips
- Verbosity
- Profiling startup time
- Profiling at runtime
- Debugging Vim scripts
- Debugging syntax files
Miscellaneous
- Additional resources
- Vim distributions
- Standard plugins
- Map CapsLock to Control
- Generating HTML from buffer
- Easter eggs
- Why hjkl for navigation?
Common problems
- Editing small files is slow
- Editing huge files is slow
- Bracketed paste (or why do I have to set ‘paste’ all the time?)
- Delays when using escape key in terminal
- Function search undo
Technical quirks
List of colorschemes
List of plugins
Intro
What is Vim?
Vim is a text editor with a long line of ancestors that
goes back to qed. Bram
Moolenaar released it in 1991.
The project is hosted online at vim.org.
Getting Vim: Use your favourite package manager or visit the download
page from vim.org.
Discussions and user questions are best done on the
vim_use mailing list or using
IRC (Freenode) in the #vim channel.
Development happens on GitHub, discussions on the
vim_dev mailing list.
Read Why, oh WHY, do those #?@! nutheads use
vi? to see common misconceptions about
Vim explained.
The Vim Philosophy
Vim adheres to the modal editing philosophy. This means that it provides
multiple modes and the meaning of keys changes according to the mode. You
navigate files in normal mode, you insert text in insert mode, you select
lines in visual mode, you access commands in command-line mode and so on.
This might sound complicated at first, but has a huge advantage: you don’t have
to break your fingers by holding several keys at once, most of the time you
simply press them one after the other. The more common the task, the fewer keys
are needed.
A related concept that works well with modal editing are operators and motions.
Operators start a certain action, e.g. changing, removing, or selecting text.
Afterwards you specify the region of text you want to act on using a motion.
To change everything between parentheses, use ci( (read change inner
parentheses). To remove an entire paragraph of text, use dap (read delete
around paragraph).
If you see advanced Vim users working, you’ll notice that they speak the
language of Vim as well as pianists handle their instruments. Complex
operations are done using only a few key presses. They don’t even think about it
anymore as muscle memory took
over already. This reduces cognitive
load and helps to focus on the
actual task.
First steps
Vim comes bundled with an interactive tutorial that teaches the most basic
things you need to know about. You can start it from the shell:
$ vimtutor
Don’t be put off by how boring it looks like and work through the exercises. The
editors or IDEs you used before were most probably all non-modal, so working by
switching modes will seem awkward at first, but the more you use Vim, the more
it becomes muscle memory.
Vim was bolted on Stevie, a
vi clone, and supports two operating modes:
“compatible” and “nocompatible”. Using Vim in compatible mode means using vi
defaults for all options, opposed to Vim defaults. As long as you didn’t create
a user vimrc yet or started Vim with vim -N, compatible mode is assumed! Don’t
use Vim in compatible mode. Just don’t.
Next steps:
- Create your own vimrc.
- Have some cheatsheets ready for the first weeks.
- Read through the basics section to learn what is even possible.
- Learn on demand! You never finish learning Vim. If you encounter any
problems, just look for it on the internet. Your problem was solved already.
Vim comes with great documentation and knowing how to navigate it is a must:
Getting help offline. - Have a look at the additional resources.
One last advice: Please learn how to use Vim properly before starting to add all
kinds of hyped plugins that only implement features that
Vim already supports natively.
Minimal vimrc
The user vimrc can be put into ~/.vimrc or for the sake of better separation
into ~/.vim/vimrc. The latter makes it easy to put the entire configuration
under version control and upload it to, let’s say GitHub.
You find many “minimal vimrcs” all over the net, and maybe my version isn’t as
minimal as it should be, but it provides a good set of sane settings that I deem
to be useful for starting out.
Eventually you have to read up on all the mentioned settings anyway and decide
for yourself. :-)
So here it is: minimal-vimrc
In case you’re interested, here’s
my vimrc.
TIP: Most plugin authors maintain several plugins and also publish their
vimrc on GitHub (often in a repository called “vim-config” or “dotfiles”), so
whenever you find a plugin you like, look up its maintainer’s GitHub page and
look through the repositories.
What kind of Vim am I running?
Looking at :version will give you all the information you need to know about
how the currently running Vim binary was compiled.
The first line tells you when the binary was compiled and the version, e.g. 7.4.
One of the next lines states Included patches: 1-1051, which is the patch
level. Thus, your exact Vim version is 7.4.1051.
Another line states something like Tiny version without GUI or Huge version with GUI. The obvious information from that is whether your Vim includes GUI
support, e.g. for starting gvim from the shell or running :gui from Vim
within a terminal emulator. The other important information is the Tiny and
Huge. Vim distinguishes between feature sets called tiny, small, normal,
big, and huge, all enabling different subsets of features.
The majority of :version output is consumed by the feature list itself.
+clipboard means the clipboard feature was compiled in, -clipboard means it
wasn’t compiled in.
A few Vim features need to be compiled in for them to work. E.g. for :prof to
work, you need a Vim with a huge feature set, because that set enables the
+profile feature.
If that’s not the case and you installed Vim from a package manager, make sure
to install a package called vim-x, vim-x11, vim-gtk, vim-gnome or
similar, since these packages usually come with the huge feature set.
You can also test for the version or features programmatically:
" Do something if running at least Vim 7.4.42 with +profile enabled.
if (v:version > 704 || v:version == 704 && has('patch42')) && has('profile')
  " do stuff
endif
Help:
:h :version
:h feature-list
:h +feature-list
:h has-patch
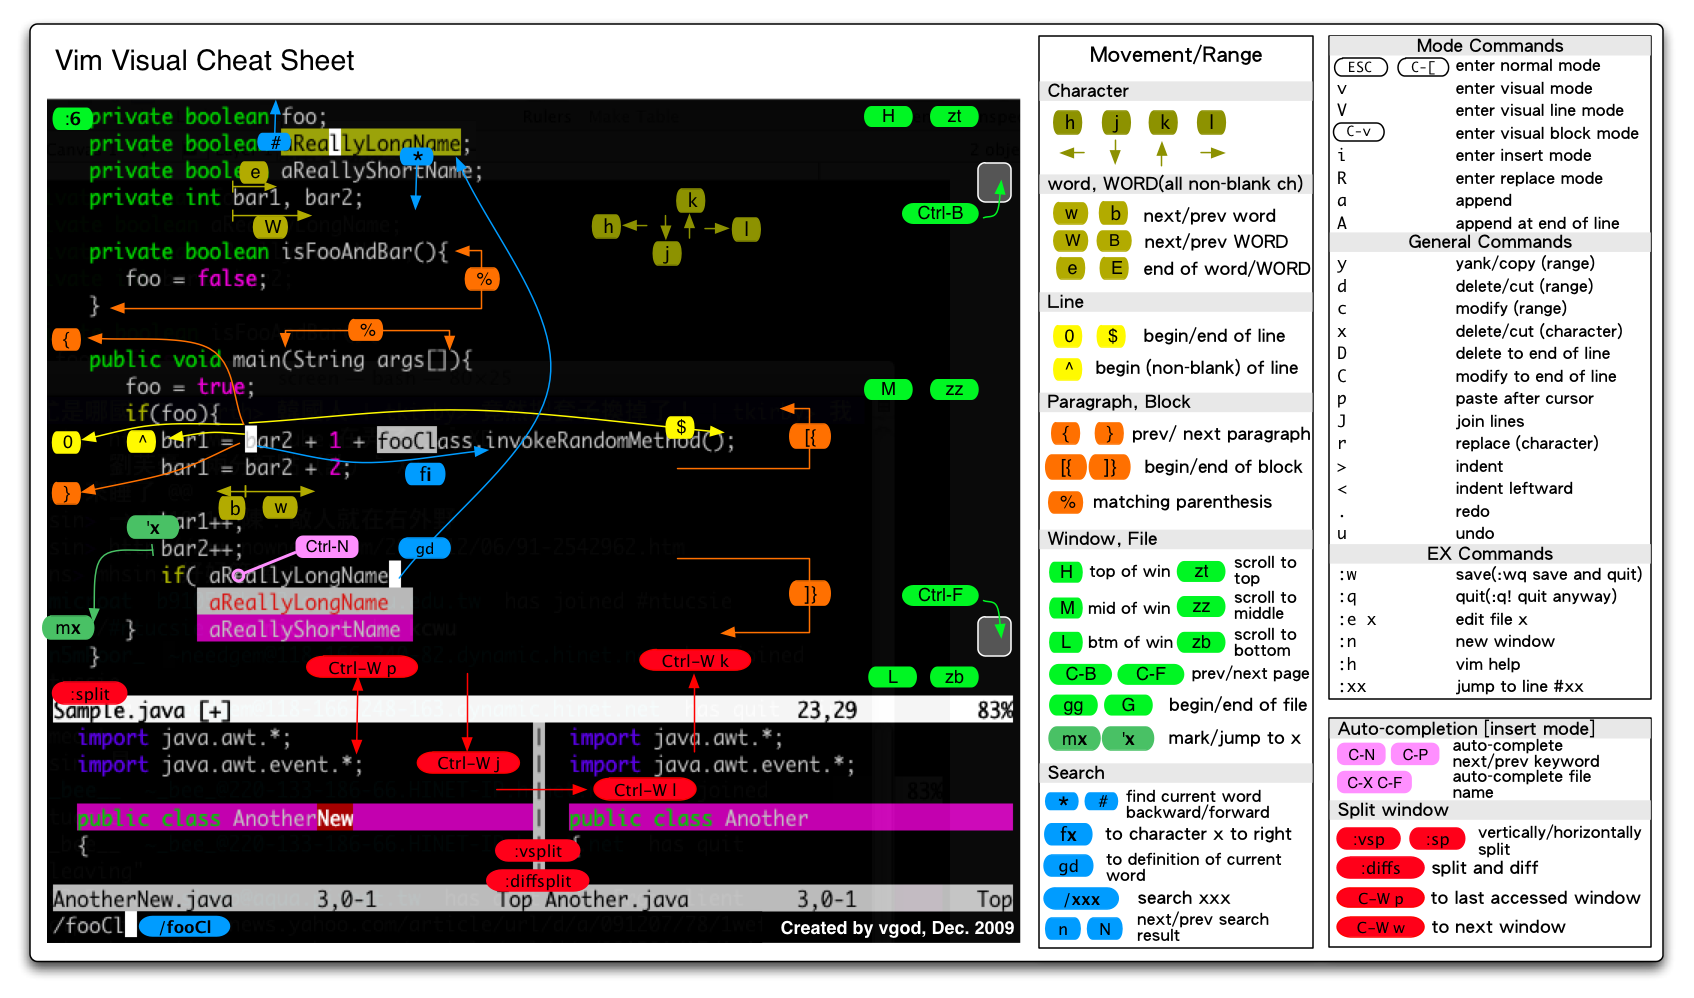
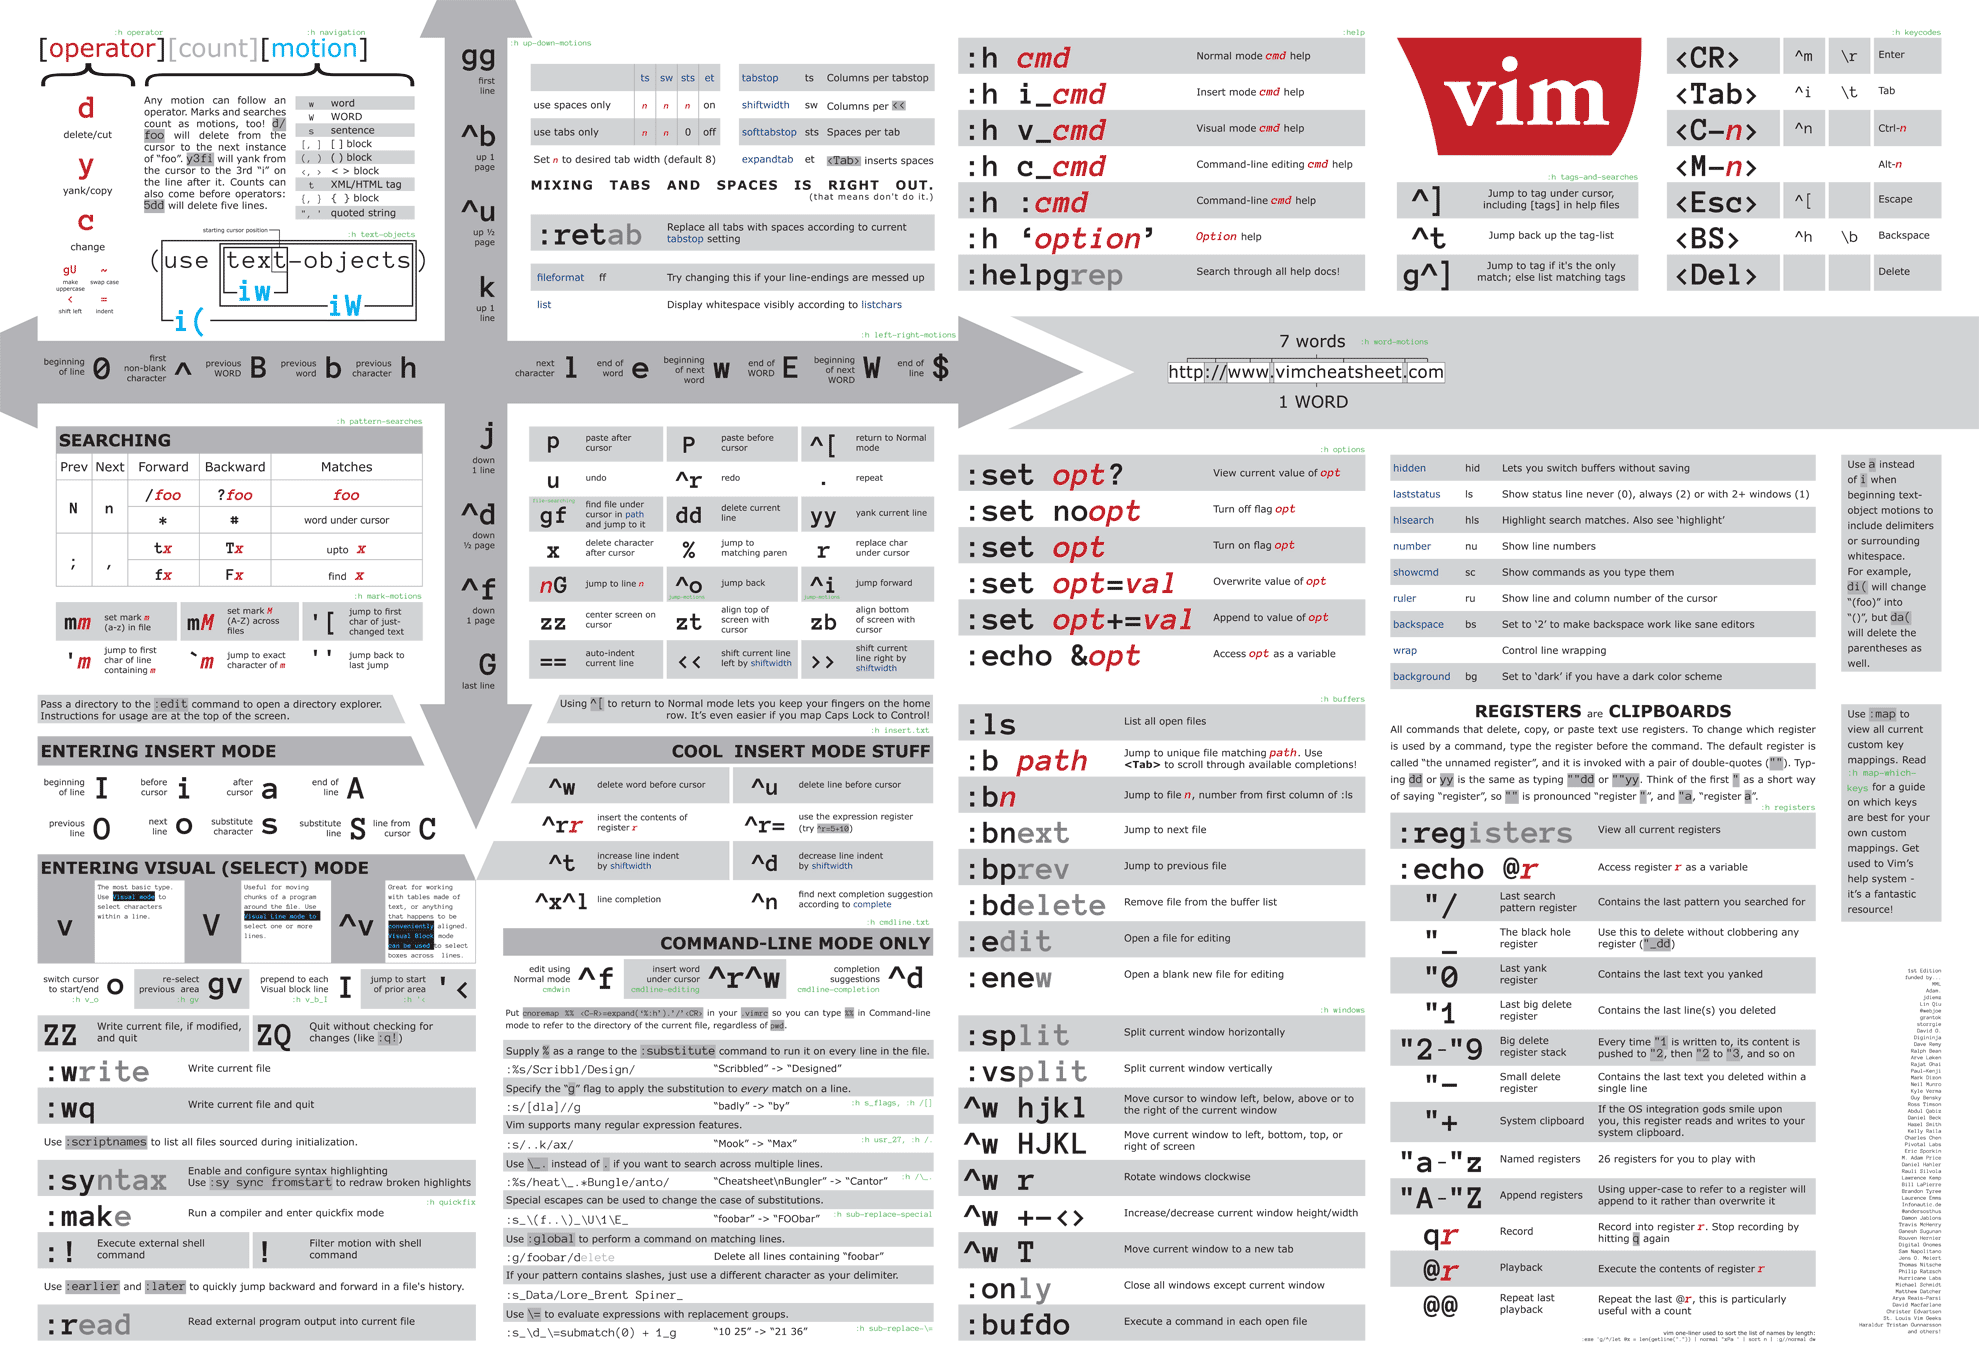
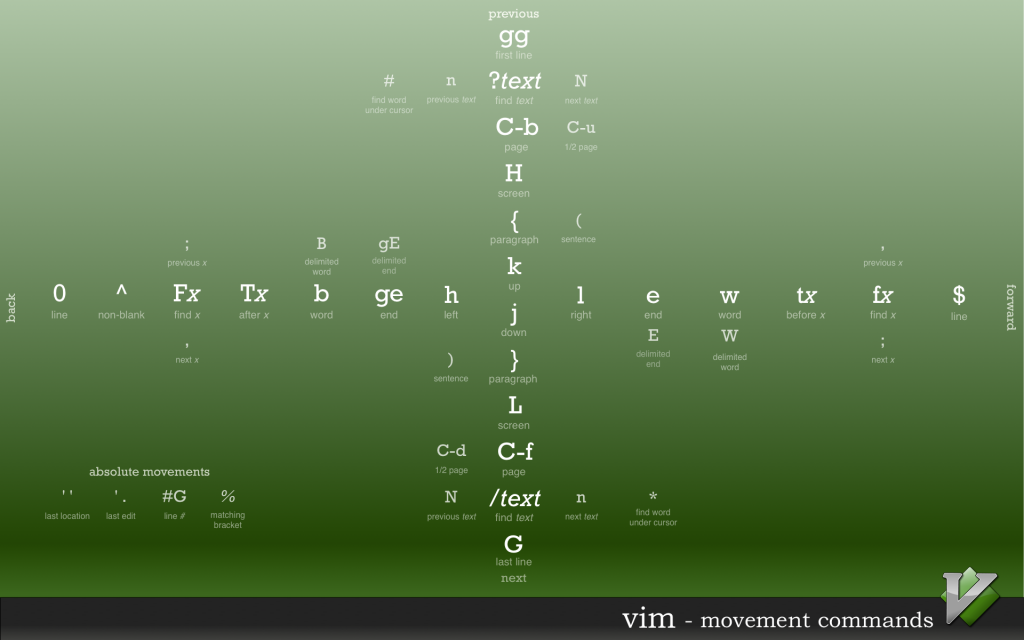
Cheatsheets
- http://people.csail.mit.edu/vgod/vim/vim-cheat-sheet-en.png
- https://cdn.shopify.com/s/files/1/0165/4168/files/preview.png
- http://www.nathael.org/Data/vi-vim-cheat-sheet.svg
- http://michael.peopleofhonoronly.com/vim/vim_cheat_sheet_for_programmers_screen.png
- http://www.rosipov.com/images/posts/vim-movement-commands-cheatsheet.png
Or quickly open a cheatsheet from within Vim: vim-cheat40.
Basics
Buffers, windows, tabs
Vim is a text editor. Every time text is shown, the text is part of a
buffer. Each file will be opened in its own buffer. Plugins show stuff in
their own buffers etc.
Buffers have many attributes, e.g. whether the text it contains is modifiable,
or whether it is associated with a file and thus needs to be synchronized to
disk on saving.
Windows are viewports onto buffers. If you want to view several files at
the same time or even different locations of the same file, you use windows.
And please, please don’t call them splits. You can split a window in two, but
that doesn’t make them splits.
Windows can be split vertically or horizontally and the heights and widths of
existing windows can be altered, too. Therefore, you can use whatever window
layout you prefer.
A tab page (or just tab) is a collection of windows. Thus, if you want to
use multiple window layouts, use tabs.
Putting it in a nutshell, if you start Vim without arguments, you’ll have one
tab page that holds one window that shows one buffer.
By the way, the buffer list is global and you can access any buffer from any
tab.
Active, loaded, listed, named buffers
Run Vim like this vim file1. The file’s content will be loaded into a buffer.
You have a loaded buffer now. The content of the buffer is only synchronized
to disk (written back to the file) if you save it within Vim.
Since the buffer is also shown in a window, it’s also an active buffer. Now
if you load another file via :e file2, file1 will become a hidden buffer
and file2 the active one.
Both buffers are also listed, thus they will get listed in the output of
:ls. Plugin buffers or help buffers are often marked as unlisted, since
they’re not regular files you usually edit with a text editor. Listed and
unlisted buffers can be shown via :ls!.
Unnamed buffers, also often used by plugins, are buffers that don’t have an
associated filename. E.g. :enew will create an unnamed scratch buffer. Add
some text and write it to disk via :w /tmp/foo, and it will become a named
buffer.
Argument list
The global buffer list is a Vim thing. Before that, in
vi, there only used to be the argument list, which is also available in Vim.
Every filename given to Vim on the shell command-line, is remembered in the
argument list. There can be multiple argument lists: by default all arguments
are put into the global argument list, but you can use :arglocal to create a
new argument list that is local to the window.
List the current arguments with :args. Switch between files from the argument
list with :next, :previous, :first, :last and friends. Alter it with
:argadd, :argdelete or :args with a list of files.
If you should prefer using the buffer or argument list for working with files is
a matter of taste. My impression is that most people use the buffer list
exclusively.
Nevertheless, there is one huge use case for the argument list: batch processing
via :argdo! A simple refactoring example:
:args **/*.[ch]
:argdo %s/foo/bar/ge | update
This replaces all occurrences of “foo” by “bar” in all C source and header files
from the current directory and below.
Help: :h argument-list
Mappings
You can define your own mappings with the :map family of commands. Each
command of that family defines a mapping for a certain set of modes. Technically
Vim comes with a whopping 12 modes, 6 of them can be mapped. Additionally, some
commands act on multiple modes at once.
| Recursive | Non-recursive | Unmap | Modes |
|---|---|---|---|
:map |
:noremap |
:unmap |
normal, visual, operator-pending |
:nmap |
:nnoremap |
:nunmap |
normal |
:xmap |
:xnoremap |
:xunmap |
visual |
:cmap |
:cnoremap |
:cunmap |
command-line |
:omap |
:onoremap |
:ounmap |
operator-pending |
:imap |
:inoremap |
:iunmap |
insert |
E.g. this defines the mapping for normal mode only:
:nmap <space> :echo "foo"<cr>
Unmap it again by using :nunmap <space>.
For a few more but rather uncommon modes (or combinations of them), see :h map-modes.
So far, so good. There’s only one problem that can be pretty confusing to
beginners: :nmap is recursive! That is, the right-hand side takes other
mappings into account.
So you defined a mapping that simply echoes “Foo”:
:nmap b :echo "Foo"<cr>
But what if you want to map the default behavior of b (going one word back) to
another key?
:nmap a b
If you hit a, we expect the cursor to go back a word, but instead
“Foo” is printed in the command-line! Because the right-hand side, b, was
mapped to another action already, namely :echo "Foo"<cr>.
The proper way to resolve this problem is to use a non-recursive mapping
instead:
:nnoremap a b
Rule of thumb: Always use non-recursive mappings unless recursing is actually
desired.
Look up your mappings by not giving a right-hand side. E.g. :nmap shows all
normal mappings and :nmap <leader> shows all normal mappings that start with
the mapleader.
If you want to disable a standard mapping, map them to the special <nop>
character, e.g. :noremap <left> <nop>.
Help:
:h key-notation
:h mapping
:h 05.3
Mapleader
The mapleader is simply a placeholder than can be used with custom mappings and
is set to \ by default.
nnoremap <leader>h :helpgrep<space>
This mapping is triggered by \h. If you want to use <space>h instead:
let mapleader = ' '
nnoremap <leader>h :helpgrep<space>
Moreover, there is <localleader> that is the local counterpart to <leader>
and is supposed to be used for mappings that are local to the buffer, eg.
filetype-specific plugins. It also defaults to \.
Note: Set the mapleaders before mappings! All leader mappings that are in
effect already, won’t change just because the mapleader was changed. :nmap <leader> will show all normal mode leader mappings with the mapleader resolved
already, so use it to double-check your mappings.
See :h mapleader and :h maplocalleader for more.
Registers
Registers are slots that save text. Copying text into a register is called
yanking and extracting text from a register is called pasting.
Vim provides the following registers:
| Type | Character | Filled by? | Readonly? | Contains text from? |
|---|---|---|---|---|
| Unnamed | " |
vim | [ ] | Last yank or deletion. (d, c, s, x, y) |
| Numbered | 0 to 9 |
vim | [ ] | Register 0: Last yank. Register 1: Last deletion. Register 2: Second last deletion. And so on. Think of registers 1-9 as a read-only queue with 9 elements. |
| Small delete | - |
vim | [ ] | Last deletion that was less than one line. |
| Named | a to z, A to Z |
user | [ ] | If you yank to register a, you replace its text. If you yank to register A, you append to the text in register a. |
| Read-only | :, ., % |
vim | [x] | :: Last command, .: Last inserted text, %: Current filename. |
| Alternate buffer | # |
vim | [ ] | Most of the time the previously visited buffer of the current window. See :h alternate-file |
| Expression | = |
user | [ ] | Evaluation of the VimL expression that was yanked. E.g. do this in insert mode: <c-r>=5+5<cr> and “10” will be inserted in the buffer. |
| Selection | +, * |
vim | [ ] | * and + are the clipboard registers. |
| Drop | ~ |
vim | [x] | From last drag’n’drop. |
| Black hole | _ |
vim | [ ] | If you don’t want any other registers implicitly affected. E.g. "_dd deletes the current line without affecting registers ", 1, +, *. |
| Last search pattern | / |
vim | [ ] | Last pattern used with /, ?, :global, etc. |
Each register that is not readonly can be set by the user:
:let @/ = 'register'
Afterwards n would jump to the next occurrence of “register”.
There are numerous exceptions when registers get implicitly filled, so be sure
to read :h registers.
Yank with y and paste with p/P, but mind that Vim distinguishes between
characterwise and linewise visual selections. See :h linewise.
Example: linewise
yy (or just Y) yanks the current line, move the cursor somewhere else, use
p to paste below the current line P for pasting above it.
Example: charwise
Yank the first word with 0yw, move somewhere else, paste after the cursor on
the current line with p and before the cursor with P.
Example: explicit naming of register
"aY yanks the current line into register a. Move to another line. "AY
appends the current line to register a.
I suggest playing around with all these registers a bit and constantly checking
:reg, so you can see what’s actually happening.
Fun fact: In Emacs “yanking” stands for pasting (or reinserting previously
killed text) not copying.
Ranges
Ranges are pretty easy to understand, but many Vimmers don’t know about their
full potential.
- Many commands take ranges.
- An address denotes a certain line.
- A range is either a single address or a pair of addresses separated by either
,or;. - Ranges tell commands which lines to act on.
- Most commands act only on the current line by default. Notable exceptions are
:writeand:globalwhich act on all lines.
The usage of ranges is pretty intuitive, so here are some examples (using :d
as short form of :delete):
| Command | Lines acted on |
|---|---|
:d |
Current line. |
:.d |
Current line. |
:1d |
First line. |
:$d |
Last line. |
:1,$d |
All lines. |
:%d |
All lines (syntactic sugar for 1,$). |
:.,5d |
Current line to line 5. |
:,5d |
Also current line to line 5. |
:,+3d |
Current line and the next 3 lines. |
:1,+3d |
First line to current line + 3. |
:,-3d |
Current line and the last 3 lines. (Vim will prompt you, since this is a reversed range.) |
:3,'xdelete |
Lines 3 to the line marked by mark x. |
:/^foo/,$delete |
From the next line that starts with “foo” to the end. |
:/^foo/+1,$delete |
From the line after the line that starts with “foo” to the end. |
Note that instead of ,, ; can be used as a separator. The difference is that
in the case of from,to, the to is relative to the current line, but when
using from;to, the to is relative to the address of from! Assuming you’re
on line 5, :1,+1d would delete lines 1 to 6, whereas :1;+1d would only
delete lines 1 and 2.
The / address can be preceded with another address. This allows you to stack
patterns, e.g.:
:/foo//bar//quux/d
This would delete the first line containing “quux” after the first line
containing “bar” after the first line containing “foo” after the current line.
Sometimes Vim automatically prepends the command-line with a range. E.g. start a
visual line selection with V, select some lines and type :. The command-line
will be populated with the range '<,'>, which means the following command will
use the previously selected lines as a range. (This is also why you sometimes
see mappings like :vnoremap foo :<c-u>command. Here <c-u> is used to remove
the range, because Vim will throw an error when giving a range to a command that
doesn’t support it.)
Another example is using !! in normal mode. This will populate the
command-line with :.!. If followed by an external program, that program’s
output would replace the current line. So you could replace the current
paragraph with the output of ls by using :?^$?+1,/^$/-1!ls. Fancy!
Help:
:h cmdline-ranges
:h 10.3
Marks
You use marks to remember a position, that is line number and column, in a file.
| Marks | Set by… | Usage |
|---|---|---|
a - z |
User | Local to file, thus only valid within one file. Jumping to a lowercase mark, means jumping within the current file. |
A - Z |
User | Global, thus valid between files. Also called file marks. Jumping to a file mark may switch to another buffer. |
0 - 9 |
viminfo | 0 is the position when the viminfo file was written last. In practice this means when the last Vim process ended. 1 is the position of when the second last Vim process ended and so on. |
Put '/g' or `/g` in front of a mark to form a motion.
Use mm to remember the current position with mark “m”. Move around the file
and then jump back via 'm (first non-blank) or `m (exact column).
Lowercase marks will be remembered after exiting Vim, if you tell your viminfo
file to do so, see :h viminfo-'.
Use mM to remember the current position with file mark “M”. Switch to another
buffer and switch back via 'M or `M.
Other motions include:
| Motion | Jump to… |
|---|---|
'[, `[ |
First line or character of previously changed or yanked text. |
'], `] |
Last line or character of previously changed or yanked text. |
'<, `< |
Beginning line or character of last visual selection. |
'>, `> |
Ending line or character of last visual selection. |
'', `` |
Position before the latest jump. |
'", `" |
Position when last exiting the current buffer. |
'^, `^ |
Position where last insertion stopped. |
'., `. |
Position where last change was made. |
'(, `( |
Start of current sentence. |
'), `) |
End of current sentence. |
'{, `{ |
Start of current paragraph. |
'}, `} |
End of current paragraph. |
Marks can also be used in a range. You probably saw this before and
wondered what it means: Select some text in visual mode and do :, the
command-line will be prepended with :'<,'>, which means the following command
would get a range that denotes the visual selection.
Use :marks to list all marks. Read everything in :h mark-motions.
Completion
Vim provides many kinds of insert mode completions. If there are multiple
matches, a popup menu will let you navigate to the match of your choice.
Typical kinds of completion are tags, functions from imported modules or
libraries, file names, dictionary or simply words from the current buffer.
Vim provides a mapping for each kind of completion and they all start with
<c-x> (remember to use them in insert mode):
| Mapping | Kind | Help |
|---|---|---|
<c-x><c-l> |
whole lines | :h i^x^l |
<c-x><c-n> |
keywords from current file | :h i^x^n |
<c-x><c-k> |
keywords from 'dictionary' option |
:h i^x^k |
<c-x><c-t> |
keywords from 'thesaurus' option |
:h i^x^t |
<c-x><c-i> |
keywords from current and included files | :h i^x^i |
<c-x><c-]> |
tags | :h i^x^] |
<c-x><c-f> |
file names | :h i^x^f |
<c-x><c-d> |
definitions or macros | :h i^x^d |
<c-x><c-v> |
Vim commands | :h i^x^v |
<c-x><c-u> |
user defined (as specified in 'completefunc') |
:h i^x^u |
<c-x><c-o> |
omni completion (as specified in 'omnifunc') |
:h i^x^o |
<c-x>s |
spelling suggestions | :h i^Xs |
People might be confused about the difference between user defined completion
and omni completion, but technically they do the same thing. They take a
function that inspects the current position and return a list of suggestions.
User defined completion is defined by the user for their own personal purposes.
(Surprise!) It could be anything. Omni completion is meant for filetype-specific
purposes, like completing struct members or class methods, and is often set by
filetype plugins.
Vim also allows for completing multiple kinds at once by setting the
'complete' option. By default that option includes quite a lot, so be sure to
trim it to your taste. You can trigger this completion by using either <c-n>
(next) and <c-p> (previous), which also happen to be the keys used for
choosing entries in the popup menu. See :h i^n and :h 'complete' for more on
this.
Be sure to check out :h 'completeopt' for configuring the behaviour of the
popup menu. The default is quite sane, but I prefer adding “noselect” as well.
Help:
:h ins-completion
:h popupmenu-keys
:h new-omni-completion
Motions, operators, text objects
Motions move the cursor. You all know h/j/k/l. Or w and b. Even
/ is a motion. They also take a count. 2?the<cr> jumps to the second last
occurrence of “the”.
See :h navigation and everything below for all available motions.
Operators act on a region of text, e.g. d, ~, gU, > to name just a
few. They get used in two contexts, either in normal or visual mode. In normal
mode, operators come first followed by a motion, e.g. >j. In visual mode,
operators simply act on the selection, e.g. Vjd.
Like motions, operators take a count, e.g. 2gUw makes the rest of the current
word and the next one uppercase. Since motions and operators take counts,
2gU2w works just as well and executes gU2w twice.
See :h operator for all available operators. Use :set tildeop to make ~
act as an operator.
Text objects act on the surrounding area, opposed to motions that act into
one direction. Actually they work on objects, e.g. a whole word, a whole
sentence, everything between parentheses, and so on.
Text objects can’t be used to move the cursor in normal mode, because even the
most-skilled cursors can’t jump into two directions at the same time. It works
in visual mode though, because then one side of the object is already selected
and the cursor simply jumps to the other side.
Text objects start with either i (think inner) or a (think around)
followed by a character denoting the object. With i it only acts on the object
itself, with a on the object plus trailing whitespace. E.g. diw deletes the
current word and ci( changes everything between parentheses.
Text objects take a count. Imagine ((( ))) and the cursor on or between the
most inner parentheses, then d2a( will remove the 2 inner pairs of parentheses
and everything in between.
See :h text-objects for all available text objects.
Autocmds
On many occasions, Vim emits events. You hook into these events by using
autocmds.
You wouldn’t use Vim if there weren’t autocmds. They’re used all the time, even
if you don’t notice it. Don’t believe me? Check :au, but don’t let the output
overwhelm you. These are all the autocmds that are in effect right now!
See :h {event} for a quick overview of all available events and :h autocmd-events-abc for more details.
A typical example would be setting filetype-specific settings:
autocmd FileType ruby setlocal shiftwidth=2 softtabstop=2 comments-=:#
But how does a buffer even know that it contains Ruby code? Because another
autocmd detected it as that and set the filetype accordingly which again
triggered the FileType event.
One of the first things everyone adds to their vimrc is filetype on. This
simply means that filetype.vim is read at startup which sets autocmds for
almost all filetypes under the sun.
If you’re brave enough, have a look at it: :e $VIMRUNTIME/filetype.vim. Search
for “Ruby” and you’ll find that Vim simply uses the file extension .rb to
detect Ruby files:
NOTE: Autocmds of the same event are executed in the order they were
created. :au shows them in the correct order.
au BufNewFile,BufRead *.rb,*.rbw setf ruby
The BufNewFile and BufRead events in this case are hardcoded in the C
sources of Vim and get emitted everytime you open a file via :e and similar
commands. Afterwards all the hundreds of filetypes from filetype.vim are
tested for.
Putting it in a nutshell, Vim makes heavy use of events and autocmds but also
exposes a clean interface to hook into that event-driven system for
customization.
Help: :h autocommand
Changelist, jumplist
The positions of the last 100 changes are kept in the changelist. Several
small changes on the same line will be merged together, but the position will be
that of the last change nevertheless (in case you added something in the middle
of the line).
Every time you jump, the position before the jump is remembered in the
jumplist. A jumplist has up to 100 entries. Each window has its own
jumplist. When you split a window, the jumplist is copied.
A jump is one of the following commands: ', `, G, /, ?, n, N,
%, (, ), [[, ]], {, }, :s, :tag, L, M, H and commands
that start editing a new file.
| List | List all entries | Go to older position | Go to newer position |
|---|---|---|---|
| jumplist | :jumps |
[count]<c-o> |
[count]<c-i> |
| changelist | :changes |
[count]g; |
[count]g, |
When you list all entries, a marker > will be used to show the current
position. Usually that will be below position 1, the latest position.
If you want both lists to persist after restarting Vim, you need to use the
viminfo file and :h viminfo-'.
NOTE: The position before the latest jump is also kept as a mark
and can be jumped to via `` or ''.
Help:
:h changelist
:h jumplist
Undo tree
The latest changes to the text state are remembered. You can use undo to
revert changes and redo to reapply previously reverted changes.
The important bit to understand it that the data structure holding recent
changes is not a
queue but a
tree! Your changes are
nodes in the tree and each (but the top node) has a parent node. Each node keeps
information about the changed text and time. A branch is a series of nodes that
starts from any node and goes up to the top node. New branches get created when
you undo a change and then insert something else.
ifoo<esc>
obar<esc>
obaz<esc>
u
oquux<esc>
Now you have 3 lines and the undo tree looks like this:
     foo(1)
       /
    bar(2)
   /      \
baz(3)   quux(4)
The undo tree has 4 changes. The numbers represent the time the nodes were
created.
Now there are two ways to traverse this tree, let’s call them branch-wise and
time-wise.
Undo (u) and redo (<c-r>) work branch-wise. They go up and down the current
branch. u will revert the text state to the one of node “bar”. Another u
will revert the text state even further, to the one of node “foo”. Now <c-r>
goes back to the state of node “bar” and another <c-r> to the state of node
“quux”. (There’s no way to reach node “baz” using branch-wise commands anymore.)
Opposed to this, g- and g+ work time-wise. Thus, g- won’t revert to the
state of node “bar”, like u does, but to the chronologically previous state,
node “baz”. Another g- would revert the state to the one of node “bar” and so
on. Thus, g- and g+ simply go back and forth in time, respectively.
| Command / Mapping | Action |
|---|---|
[count]u, :undo [count] |
Undo [count] changes. |
[count]<c-r>, :redo |
Redo [count] changes. |
U |
Undo all changes to the line of the latest change. |
[count]g-, :earlier [count]? |
Go to older text state [count] times. The “?” can be either “s”, “m”, “h”, “d”, or “f”. E.g. :earlier 2d goes to the text state from 2 days ago. :earlier 1f will go to the state of the latest file save. |
[count]g+, :later [count]? |
Same as above, but other direction. |
The undo tree is kept in memory and will be lost when Vim quits. See Undo
files for how to enable persistent undo.
If you’re confused by the undo tree,
undotree does a great job at visualizing
it.
Help:
:h undo.txt
:h usr_32
Quickfix and location lists
The quickfix list is a data structure that holds file positions. Essentially,
each entry in the quickfix list consists of a file path, a line number and
optional column, and a description.
Typical use cases are assembling compiler errors or results of a grep tool.
Vim has a special type of buffer for showing the quickfix list: the quickfix
buffer. Each line in the quickfix buffer shows one entry from the quickfix list.
Usually you open a new window to display the quickfix list: the quickfix window.
When that happens, the last window gets associated with the quickfix window.
In the quickfix buffer <cr> opens the selected entry in the associated window
and <c-w><cr> in a new window.
The quickfix list was named after the “quick fix” feature from the Aztec C
compiler.
Actually there are two kinds of lists: quickfix and location lists. They behave
almost the same, but have the follwing differences:
- There is only one quickfix list. There can be multiple location lists; one per
window. - They use slightly different commands for navigation.
| Action | Quickfix | Location |
|---|---|---|
| open window | :copen |
:lopen |
| close window | :cclose |
:lclose |
| next entry | :cnext |
:lnext |
| previous entry | :cprevious |
:lprevious |
| first entry | :cfirst |
:lfirst |
| last entry | :clast |
:llast |
Mind that the quickfix and location windows don’t need to be open for these
commands to work.
See :h quickfix for more information and a full list of commands.
For conciseness, quickfix and location are often abbreviated as qf and
loc respectively.
Example:
Let us use our good old friend grep for searching the files in the current
directory recursively for a certain query and put the results in the quickfix
list.
:let &grepprg = 'grep -Rn $* .'
:grep! foo
<grep output - hit enter>
:copen
Assuming any files contained the string “foo”, it should be shown now in the
quickfix window.
Macros
Vim allows recording typed characters into a register. It’s a
great way to automate certain tasks on the fly. (For more elaborate tasks, Vim
scripting should be used instead.)
- Start recording by typing
qfollowed by the register, e.g.q. (The
command-line will signify this via “recording @q”.) - Stop recording by hitting
qonce again. - Execute the macro via
[count]@q. - Repeat the last used macro via
[count]@@.
Example 1:
Insert a line and repeat it 10 times:
qq
iabc<cr><esc>
q
10@q
(The same could be done without macros: oabc<esc>10.)
Example 2:
For adding line numbers in front of all lines, start on the first line and add
"1. " to it manually. Increment the number under the cursor by using <c-a>,
displayed as ^A.
qq
0yf jP0^A
q
1000@q
Here we simply hope that the file doesn’t contain more than 1000 lines when
using 1000@q, but we can also use a recursive macro, which executes until
the macro can’t be applied to a line anymore:
qq
0yf jP0^A@q
q
@q
(The same could be done without macros: :%s/^/\=line('.') . '. ')
Mind that I also show how to achieve the same without using macros, but this
mostly works only for such simple examples. For more complex automation, macros
are the bomb!
Also see: Quickly edit your macros
Help:
:h recording
:h 'lazyredraw'
Colorschemes
Colorschemes are the way to style your Vim. Vim consists of many components and
each of those can be customized with different colors for the foreground,
background and a few other attributes like bold text etc. They can be set like
this:
:highlight Normal ctermbg=1 guibg=red
This would paint the background of the editor red. See :h :highlight for more
information.
So, colorschemes are mostly collections of :highlight commands.
Actually, most colorschemes are really 2 colorschemes! The example above sets
colors via ctermbg and guibg. The former definition (cterm*) will only be
used if Vim was started in a terminal emulator, e.g. xterm. The latter (gui*)
will be used in graphical environments like gvim or MacVim.
If you ever happen to use a colorscheme in terminal Vim and the colors don’t
look like the ones in the screenshot at all, chances are that the colorscheme
only defines colors for the GUI. Conversely, if you use a graphical Vim (e.g.
gvim or MacVim) and the colors look off, the colorscheme might only define
colors for the terminal.
The latter case can be “solved” by enabling true colors in Neovim or Vim
7.4.1830 and newer. This makes terminal Vim use the GUI definitions instead, but
also requires the terminal emulator itself and all software in between (e.g.
tmux) to be capable of handling true colors. (This
gist gives a good overview about the
topic.)
Help:
:h 'termguicolors'- List of colorschemes
- Cosmetic changes to colorschemes
Folding
Every text (or source code) has a certain structure. If you have a structure, it
means you have regions of logically separated text. Folding allows to “fold”
such a region into a single line and displaying a short description. There are
many commands that act on these regions called folds. Folds can be nested.
Vim distinguishes between several types of fold methods:
| ‘foldmethod’ | Usage |
|---|---|
| diff | Used in diff windows to fold unchanged text. |
| expr | Uses 'foldexpr' to basically create a new fold method. |
| indent | Folds based on indentation. |
| manual | Create folds yourself via zf, zF, and :fold. |
| marker | Folds based on markers in the text (often in comments). |
| syntax | Folds based on syntax, e.g. folding if blocks. |
NOTE: Folding can be computationally intensive! If you experience any
performance drawbacks (small delays when typing), have a look at
FastFold, which prevents Vim from
updating folds when it’s not needed.
Help:
:h usr_28
:h folds
Sessions
If you save a view (:h :mkview), the current state of the window (and
options and mappings) gets saved for later use (:h :loadview).
A session saves the views of all windows plus global settings. It basically
makes a snapshot of your current Vim instance and saves it in a session file.
Let me stress this: it saves the current state; everything done after saving a
session won’t be part of the session file. To “update” a session, simply write
it out again.
This makes it perfect for saving your projects and easy to switch between
them.
Try it right now! Open a few windows and tabs and do :mksession Foo.vim. If
you omit the filename, Session.vim will be assumed. The file will be saved to
the current working directory, check :pwd. Restart Vim and do :source Foo.vim and voilà, the buffer list, window layout, mappings, working directory
etc. should all be the same as before you saved the session. Do some more work
and update the session by overwriting the already existing session file with
:mksession! Foo.vim.
Note that a session file is really just a collection of Vim commands that are
supposed to restore a certain state of a Vim instance, so feel free to take a
look at it: :vs Foo.vim.
You can tell Vim what things to save in a session by setting 'sessionoptions'.
For scripting purposes Vim keeps the name of the last sourced or written session
in the internal variable v:this_session.
Help:
:h Session
:h 'sessionoptions'
:h v:this_session
Locality
Many of the concepts mentioned above also have local counterparts:
| Global | Local | Scope | Help |
|---|---|---|---|
:set |
:setlocal |
buffer or window | :h local-options |
:map |
:map <buffer> |
buffer | :h :map-local |
:autocmd |
:autocmd * <buffer> |
buffer | :h autocmd-buflocal |
:cd |
:lcd |
window | :h :lcd |
<leader> |
<localleader> |
buffer | :h maplocalleader |
Variables also have different scopes.
Usage
Getting help offline
Vim comes with great documentation in the form of single text files with a
special layout. Vim uses a system based on tags for accessing certain parts of
those help files.
First of all, read this: :help :help. This will open the file
$VIMRUNTIME/doc/helphelp.txt in a new window and jump to the :help tag
within that file.
A few simple rules:
- options are enclosed in single quotes, e.g.
:h 'textwidth' - VimL functions end in
(), e.g.:h reverse() - commands start with
:, e.g.:h :echo
You can use <c-d> (this is ctrl+d) to list all tags that
match the currently entered query. E.g. :h tab<c-d> will get you a list of all
tags from tab over 'softtabstop' to setting-guitablabel.
You want to list all VimL functions? Simple: :h ()<c-d>. You want to list all
VimL functions that concern windows? :h win*()<c-d>.
This quickly becomes second nature, but especially in the beginning, you
sometimes don’t know any part of the tag you are looking for. You can only
imagine some keywords that could be involved. :helpgrep to the rescue!
:helpgrep backwards
This will look for “backwards” in all documentation files and jump to the first
match. The matches will be assembled in the quickfix list. Use :cn/:cp to
jump to the next/previous match. Or use :copen to open the quickfix window,
navigate to an entry and hit <cr> to jump to that match. See :h quickfix for
the whole truth.
Getting help offline (alternative)
This list was compiled by @chrisbra, one of the most active Vim developers, and
posted to vim_dev.
It’s reposted here with minor changes.
If you know what you are looking for, it is usually easier to search for it
using the help system, because the subjects follow a certain style guide.
Also, the help has the advantage of belonging to your particular Vim version, so
that obsolete topics or topics that have been added later won’t turn up.
Therefore, it is essential to learn the help system and the language it uses.
Here are some examples (not necessarily complete and I might have forgotten
something).
-
Options are enclosed in single quotes. So you would use
:h 'list'to go to
the help topic for the list option. If you only know, you are looking for a
certain option, you can also do:h options.txtto open the help page which
describes all option handling and then you can search using regular
expressions e.g./width. Certain options have their own namespace, e.g.:h cpo-a,:h cpo-A,:h cpo-b, and so on. -
Normal mode commands are just that. Use
:h gtto go to the help page for
the “gt” command. -
Regexp items always start with “/”, so
:h /\+takes you to the help item
for the “+” quantifier in Vim regexes. If you need to know anything about
regular expressions, start reading at:h pattern.txt. -
Key combinations. They usually start with a single letter indicating the mode
for which they can be used. E.g.:h i_CTRL-Xtakes you to the family of
CTRL-X commands for insert mode which can be used to auto complete different
things. Note that certain keys will always be written the same, e.g. Control
will always be CTRL. Note, for normal mode commands, the “n” is left away,
e.g.:h CTRL-A. In contrast,:h c_CTRL-Rwill describe what CTRL-R does
when entering commands in the command line and:h v_Ctrl-Atalks about
incrementing numbers in visual mode and:h g_CTRL-Atalks about the g
command (thus you have to press “g” then ). Here the “g” stand for
the normal command “g” which always expect a second key before doing
something similar to the commands starting with “z”. -
Registers always start with “quote” so use
:h quoteto find out about the
special “:” register. -
Vim script (VimL) is available at
:h eval.txt. Certain aspects of the
language are available at:h expr-Xwhere ‘X’ is a single letter, e.g.:h expr-!will take you to the topic describing the ‘!’ (Not) operator for
VimL. Also important, see:h function-listto find a short description of
all functions available. -
Mappings are talked about in the help page
:h map.txt. Use:h mapmode-i
to find out about the:imapcommand. Also use:map-topicto find out
about certain subtopics particular for mappings (e.g.:h :map-localfor
buffer-local mappings or:h map_barfor how the ‘|’ is handled in mappings. -
Command definitions are talked about at
:h command-*, so use :h command-bar
to find out about the ‘!’ argument for custom commands. -
Window management commands always start with CTRL-W, so you find the
corresponding help at:h CTRL-W_*(e.g.:h CTRL-W_pfor switch to the
previously accessed window). You can also access:h windows.txtand read
your way through, if you are looking for window handling command. -
Ex commands always start with “:”, so
:h :scovers the “:s” command. -
Use CTRL-D after typing a topic and let Vim try to complete to all available
topics. -
Use
:helpgrepto search in all help pages (usually also includes help
pages by installed plugins). See:h :helpgrepfor how to use it. Once you
have searched for a topic, all matches are available in the quickfix (or
location) window which can be opened with:copenor:lopen. There you
can also use/to further filter the matches. -
:h helphelpcontains some information on how to use the help. -
The user manual. This describes help topics for beginners in a rather
friendly way. Start at:h usr_toc.txtto find the table of content (as you
might have guessed). Skimming over that help to find certain topics, .e.g
you will find an entry “Digraphs” and “Entering special characters” in
chapter 24 (so use:h usr_24.txtto go to that particular help page). -
Highlighting groups always start with
hl-*. E.g.:h hl-WarningMsgtalks
about the “WarningMsg” highlighting group. -
Syntax highlighting is namespaced to “:syn-topic”, e.g.
:h :syn-conceal
talks about the conceal argument for the :syn command. -
Quickfix commands usually start with “:c”, while location list commands
usually start with “:l”. -
:h BufWinLeavetalks about the BufWinLeave autocmd. Also,:h autocommands-eventstalks about all possible events. -
Startup arguments always start with “-”, so
:h -ftakes you to the help of
the “-f” command switch of Vim. -
Compiled extra features always start with “+”, so
:h +concealtalks about
the conceal support. -
Error codes can be looked up directly in the help.
:h E297takes you
exactly to the description of the error message. Sometimes however, those
error codes are not described, but rather are listed at the Vim command that
usually causes this. E.g.:h hE128takes you directly to the:function
command. -
Documentation for included syntax files is usually available at
:h ft-*-syntax. E.g.:h ft-c-syntaxtalks about the C syntax file and the
options it provides. Sometimes, additional sections for omni completion (:h ft-php-omni) or filetype plugins (:h ft-tex-plugin) are available.
Also, a link to the user documentation (which describes certain commands more
from a user perspective and less detailed) will be mentioned at the top of help
pages if they are available. So :h pattern.txt mentions the user guide topics
:h 03.9 and :h usr_27.
Getting help online
If you have an issue you can’t resolve or are in need of general guidance, see
the vim_use mailing list.
Another great resource is using
IRC. The channel #vim on
Freenode is huge and usually full of helpful people.
If you want to report a Vim bug, use the
vim_dev mailing list.
Autocmds in practice
You can trigger any event right now: :doautocmd BufRead.
User events
Especially for plugins it’s useful to create your own “User” events:
function! Chibby()
  " A lot of stuff is happening here.
  " And at last..
  doautocmd User ChibbyExit
endfunction
Now users of your plugin can execute anything when Chibby finishes running:
autocmd User ChibbyExit call ChibbyCleanup()
By the way, if there’s no “catching” :autocmd, :doautocmd will output a pesky
“No matching autocommands” message. That’s why many plugins use silent doautocmd ... instead. But this has the disadvantage, that you can’t simply use
echo "foo" in the :autocmd, you have to use unsilent echo "foo" instead…
That’s why it’s better to check if there even is a receiving autocmd and not
bothering emitting the event otherwise:
if exists('#User#ChibbyExit')
  doautocmd User ChibbyExit
endif
Help: :h User
Nested autocmds
By default, autocmds do not nest! If an autocmd executes a command, which in
turn would usually trigger another event, it won’t happen.
Let’s say every time you start Vim, you want to automatically open your vimrc:
autocmd VimEnter * edit $MYVIMRC
When you now start Vim, it will open your vimrc, but the first thing you’ll
notice is that there won’t be any highlighting although usually there would be.
The problem is that :edit in your non-nested autocmd won’t trigger the
“BufRead” event, so the filetype never gets set to “vim” and
$VIMRUNTIME/syntax/vim.vim never sourced. See :au BufRead *.vim. Use this
instead:
autocmd VimEnter * nested edit $MYVIMRC
Help: :h autocmd-nested
Clipboard
Required features: +clipboard and optionally
+xterm_clipboard if you want to use the 'clipboard' option on a Unix system
with a Vim that doesn’t have GUI support.
Help:
:h 'clipboard'
:h gui-clipboard
:h gui-selections
Also see: Bracketed paste (or why do I have to set ‘paste’ all the
time?)
Clipboard usage (Windows, macOS)
Windows comes with a
clipboard
and macOS comes with a
pasteboard.
Both work like most users would expect them to work. You copy selected text with
ctrl+c/cmd+c and paste them in another application with ctrl+v/cmd+v.
Note that copied text is actually transferred to the clipboard, so you can close
the application you copied from before pasting in another application without
problems.
Whenever this happens, the clipboard register * gets filled with the
selection. From Vim use "*y and "*p to yank and paste from the clipboard
respectively.
If you don’t even want to specify the * register all the time, put this in
your vimrc:
set clipboard=unnamed
Usually all yank/delete/put operations fill the " register, now the *
register is used for the same operations, therefore simply y and p will be
enough.
Let me repeat: Using the option above means that every yank/paste, even when
only used in the same Vim window, will alter the clipboard. Decide for yourself
if this is useful or not.
If you’re even too lazy to type y, you can send every visual selection to the
clipboard by using these settings:
set clipboard=unnamed,autoselect
set guioptions+=a
Help:
:h clipboard-unnamed
:h autoselect
:h 'go_a'
Clipboard usage (Linux, BSD, …)
If your OS uses X, things work a bit different. X
implements the X Window System
Protocol which
happens to be at major version 11 since 1987, hence X is also often called X11.
Prior, in X10, cut
buffers
were introduced that kind of worked like a clipboard as in copied text was
actually held by X and it was accessible by all other applications. This
mechanism still exists in X, but its use is deprecated now and most software
doesn’t use it anymore.
Nowadays data is transferred between applications by the means of
selections.
From the 3 selection atoms defined, only 2 are used in practice: PRIMARY and
CLIPBOARD.
Selections work roughly like this:
Program A: <ctrl+c>
Program A: assert ownership of CLIPBOARD
Program B: <ctrl+v>
Program B: note that ownership of CLIPBOARD is hold by Program A
Program B: request data from Program A
Program A: respond to request and send data to Program B
Program B: receives data from Program A and inserts it into the window
| Selection | When used? | How to paste? | How to access from Vim? |
|---|---|---|---|
| PRIMARY | Selecting text | middle-click, shift+insert |
* register |
| CLIPBOARD | Selecting text and ctrl+c |
ctrl+v |
+ register |
NOTE: Selections (no, not even the CLIPBOARD selection) are never kept in
the X server! Thus, you lose the data copied with ctrl+c when the application
closes.
Use "*p to paste the PRIMARY selection or "+y1G to yank the entire file to
the CLIPBOARD selection.
If you happen to access one of the two registers all the time, consider using:
set clipboard^=unnamed      " * register
" or
set clipboard^=unnamedplus  " + register
(The ^= is used to prepend to the default value, :h :set^=.)
This will make all yank/delete/put operations use either * or + instead of
the unnamed register ". Afterwards you can simply use y or p for accessing
your chosen X selection.
Help:
:h clipboard-unnamed
:h clipboard-unnamedplus
Restore cursor position when opening file
When you open a file, the cursor will be positioned at line 1, column 1.
Fortunately the viminfo file remembers marks. The " mark contains
the position in the buffer where you left off.
autocmd BufReadPost *
    \ if line("'\"") > 1 && line("'\"") <= line("$") |
    \   execute "normal! g`\"" |
    \ endif
Read: If the mark " contains a line number greater than line 1 but not greater
than the last line in the file, jump to it.
:h viminfo-'
:h `quote
:h g`
Temporary files
Backup files
Before saving a file, Vim creates a backup file. If writing to disk was
successful, the backup file will be deleted.
With :set backup, the backup will persist. This means, the backup file will
always have the same content as the original file before the most recent save.
It’s up to you to decide whether this is useful or not.
You can disable backups entirely with :set nobackup nowritebackup, but you
shouldn’t need to nowadays. 'writebackup' is a security feature that makes
sure that you don’t lose the original file in case saving it should ever fail,
no matter whether you keep the backup file afterwards or not.
If you frequently use Vim to edit huge files, and you probably
shouldn’t, you can exclude those from backups with
'backupskip'.
Vim knows different ways to create a backup: copying and renaming.
- Copying
- A full copy of the original file is created and used as backup.
- The original file gets emptied and then filled with the content of the
Vim buffer.
- Renaming
- The original file is renamed to the backup file.
- The content of the Vim buffer gets written to a new file with the name of
the original file.
See :h 'backupcopy' for all the nitty-gritty details.
Demo:
:set backup backupskip= backupdir=. backupext=-backup
:e /tmp/foo
ifoo<esc>
:w
" original file gets created, no need for backup file
obar<esc>
:w
" backup file is created, original file gets updated
$ diff -u /tmp/foo-backup /tmp/foo
--- /tmp/foo-backup     2017-04-22 15:05:13.000000000 +0200
+++ /tmp/foo    2017-04-22 15:05:25.000000000 +0200
@@ -1 +1,2 @@
 foo
+bar
:h backup
:h write-fail
Swap files
When editing a file, unsaved changes get written to a swap file.
Get the name of the current swap file with :swapname. Disable them with :set noswapfile.
A swap file gets updated either all 200 characters or when nothing was typed for
4 seconds. They get deleted when you stop editing the file. You can change these
numbers with :h 'updatecount' and :h 'updatetime'.
If Vim gets killed (e.g. power outage), you lose all changes since the last time
the file was written to disk, but the swap file won’t be deleted. Now, if you
edit the file again, Vim will offer the chance to recover the file from the swap
file.
When two people try to edit the same file, the second person will get a notice
that the swap file already exists. It prevents people from trying to save
different versions of a file. If you don’t want that behaviour, see :h 'directory'.
:h swap-file
:h usr_11
Undo files
The undo tree is kept in memory and will be lost when Vim quits.
If you want it to persist, :set undofile. This will save the undo file for
~/foo.c in ~/foo.c.un~.
:h 'undofile'
:h undo-persistence
Viminfo files
When backup, swap, and undo files are all about text state, viminfo files are
used for saving everything else that would otherwise be lost when quitting Vim.
The viminfo file keeps histories (command line, search, input), registers,
marks, buffer list, global variables etc.
By default, the viminfo is written to ~/.viminfo.
:h viminfo
:h 'viminfo'
Example configuration for temporary files
Put all temporary files in their own directory under ~/.vim/files:
" create directory if needed
if !isdirectory($HOME.'/.vim/files') && exists('*mkdir')
  call mkdir($HOME.'/.vim/files')
endif

" backup files
set backup
set backupdir   =$HOME/.vim/files/backup/
set backupext   =-vimbackup
set backupskip  =
" swap files
set directory   =$HOME/.vim/files/swap//
set updatecount =100
" undo files
set undofile
set undodir     =$HOME/.vim/files/undo/
" viminfo files
set viminfo     ='100,n$HOME/.vim/files/info/viminfo
Editing remote files
Vim comes with the netrw plugin that enables editing remote files. Actually it
transfers the remote file to a local temporary file via scp, opens a buffer
using that file, and writes the changes back to the remote file on saving.
This is extremely useful if you want to use your local configuration opposed to
ssh’ing into a server and use whatever the admins want you to use.
:e scp://[email protected]/.vimrc
If you have a ~/.ssh/config set up already, this gets used automatically:
Host awesome
    HostName awesome.site.com
    Port 1234
    User bram
Assuming the above content in ~/.ssh/config, this works just as well:
:e scp://awesome/.vimrc
Similar can be done with a ~/.netrc, see :h netrw-netrc.
Make sure to read :h netrw-ssh-hack and :h g:netrw_ssh_cmd.
Another possibility is using sshfs
which uses FUSE to
mount a remote filesystem into your local filesystem.
Managing plugins
Pathogen was the first popular tool for
managing plugins. Actually it just adjusts the runtimepath (:h 'rtp') to
include all the things put under a certain directory. You have to clone the
repositories of the plugins there yourself.
Real plugin managers expose commands that help you to install and update plugins
from within Vim.
Block insert
This is a technique to insert the same text on multiple consecutive lines at the
same time. See this
demo.
Switch to visual block mode with <c-v>. Afterwards go down for a few lines.
Hit I or A and start entering your text.
It might be a bit confusing at first, but text is always entered for the current
line and only after finishing the current insertion, the same text will be
applied to all other lines of the prior visual selection.
So a simple example is <c-v>3jItext<esc>.
If you have lines of different length and want to append the same text right
after the end of each line, do this: <c-v>3j$Atext<esc>.
Sometime you need to place the cursor somewhere after the end of the current
line. You can’t do that by default, but you can set the virtualedit option:
set virtualedit=all
Afterwards $10l or 90| work even after the end of the line.
See :h blockwise-examples for more info. It might seem complicated at first,
but quickly becomes second nature.
If you want to get real fancy, have a look at
multiple-cursors.
Running external programs and using filters
Disclaimer: Vim is single-threaded, so running an external program in the
foreground will block everything else. Sure, you can use one of Vim’s
programming interfaces, e.g. Lua, and use its thread support, but during that
time the Vim process is blocked nevertheless. Neovim fixed that by adding a
proper job API.
(Apparently Bram is thinking about adding job control to Vim as well. If you
have a very recent version, see :helpgrep startjob.)
Use :! to start a job. If you want to list the files in the current working
directory, use :!ls. Use | for piping in the shell as usual, e.g. :!ls -1 | sort | tail -n5.
Without a range, the output of :! will be shown in a scrollable window. On the
other hand, if a range is given, these lines will be
filtered. This means they
will be piped to the
stdin
of the filter program and after processing be replaced by the
stdout
of the filter. E.g. for prepending numbers to the next 5 lines, use this:
:.,+4!nl -ba -w1 -s' '
Since manually adding the range is quite burdensome, Vim also provides some
helpers for convenience. As always with ranges, you can also select lines in
visual mode and then hit :. There’s also an operator ! that takes a motion.
E.g. !ip!sort will sort the lines of the current paragraph.
A good use case for filtering is the Go programming
language. The indentation is pretty opinionated, it even
comes with a filter called gofmt for indenting Go source code properly. So
plugins for Go often provide helper commands called :Fmt that basically do
:%!gofmt, so they indent all lines in the file.
People often use :r !prog to put the output of prog below the current line,
which is fine for scripts, but when doing it on the fly, I find it easier to use
!!ls instead, which replaces the current line.
:h filter
:h :read!
Cscope
Cscope does more things than
ctags, but only supports C (and C++ and Java to
some extent).
Whereas a tags file only knows where a symbol was defined, a cscope database
knows much more about your data:
- Where is this symbol defined?
- Where is this symbol used?
- What is this global symbol’s definition?
- Where did this variable get its value?
- Where is this function in the source files?
- What functions call this function?
- What functions are called by this function?
- Where does the message “out of space” come from?
- Where is this source file in the directory structure?
- What files include this header file?
1. Build the database
Do this in the root of your project:
$ cscope -bqR
This will create 3 files: cscope{,.in,.po}.out in the current working
directory. Think of them as your database.
Unfortunately cscope only analyzes *.[c|h|y|l] files by default. If you want
to use cscope for a Java project instead, do this:
$ find . -name "*.java" > cscope.files
$ cscope -bq
2. Add the database
Open a connection to your freshly built database:
:cs add cscope.out
Verify that the connection was made:
:cs show
(Yes, you can add multiple connections.)
3. Query the database
:cs find <kind> <query>
E.g. :cs find d foo will list all functions that are called by foo(...).
| Kind | Explanation |
|---|---|
| s | symbol: find all references to the token |
| g | global: find global definition(s) of the token |
| c | calls: find all calls to the function |
| t | text: find all instances of the text |
| e | egrep: egrep search for the word |
| f | file: open the filename |
| i | includes: find files that include the filename |
| d | depends: find functions called by this function |
I suggest some convenience mappings e.g.:
nnoremap <buffer> <leader>cs :cscope find s  <c-r>=expand('<cword>')<cr><cr>
nnoremap <buffer> <leader>cg :cscope find g  <c-r>=expand('<cword>')<cr><cr>
nnoremap <buffer> <leader>cc :cscope find c  <c-r>=expand('<cword>')<cr><cr>
nnoremap <buffer> <leader>ct :cscope find t  <c-r>=expand('<cword>')<cr><cr>
nnoremap <buffer> <leader>ce :cscope find e  <c-r>=expand('<cword>')<cr><cr>
nnoremap <buffer> <leader>cf :cscope find f  <c-r>=expand('<cfile>')<cr><cr>
nnoremap <buffer> <leader>ci :cscope find i ^<c-r>=expand('<cfile>')<cr>$<cr>
nnoremap <buffer> <leader>cd :cscope find d  <c-r>=expand('<cword>')<cr><cr>
So, when :tag (or <c-]>) jumps to a definition from the tags file, :cstag
does the same, but also takes connected cscope databases into account. The
option 'cscopetag' makes :tag act like :cstag automatically. This is very
convenient if you already have tag-related mappings.
Help: :h cscope
MatchIt
Since Vim is written in C, a lot of features assume C-like syntax. By default,
if your cursor is on { or #endif, you can use % to jump to the
corresponding } or #ifdef respectively.
Vim comes bundled with a plugin called matchit.vim which is not enabled by
default. It makes % also cycle through HTML tags, if/else/endif constructs in
VimL etc. and introduces a few new commands.
Installation for Vim 8
" vimrc
packadd! matchit
Installation for Vim 7 and older
" vimrc
runtime macros/matchit.vim
Since the documentation of matchit is pretty extensive, I suggest also doing the
following once:
:!mkdir -p ~/.vim/doc
:!cp $VIMRUNTIME/macros/matchit.txt ~/.vim/doc
:helptags ~/.vim/doc
Small intro
The plugin is ready to use now. See :h matchit-intro for the supported
commands and :h matchit-languages for the supported languages.
That said, it’s easy to define your own matching pairs:
autocmd FileType python let b:match_words = '\<if\>:\<elif\>:\<else\>'
Afterwards you can cycle through these 3 statements in any Python file by using
% (forward) or g% (backward).
Help:
:h matchit-install
:h matchit
:h b:match_words
True colors
Using true colors in a terminal emulator means being able to use 24 bits for RGB
colors. That makes 16777216 (2^24) colors instead of the usual 256.
As explained here, colorschemes can actually be two
colorschemes by having definitions for terminals (xterm) and for GUIs (gvim).
This made sense before terminal emulators learned about true colors.
After :set termguicolors, Vim starts emitting escape sequences only understood
by a terminal emulator that supports true colors. When your colors look weird,
chances are your terminal emulator doesn’t support true colors or your
colorcheme has no GUI colors defined.
Many people use the terminal multiplexer
tmux which basically sits in between the
terminal emulator and Vim. To make tmux forward the true color escape
sequences emitted by Vim, you have to put the following in the user’s
.tmux.conf:
set-option -g  default-terminal 'tmux-256color'
set-option -ga terminal-overrides ',xterm-256color:Tc'
- The first line should be the same for most people and denotes the
$TERMto
be used within tmux. - The second line adds the tmux-specific
Tc(true color) capability to the
other terminfo entries ofxterm-256color. Obviously this assumes that the
user is usingTERM=xterm-256coloroutside of tmux.
So, here is the checklist for enabling true colors:
- Read
:h 'termguicolors'. - Put
set termguicolorsin your vimrc. - Make sure your colorscheme has color definitions for GUIs. (It should contain
lines withguifgandguibg.) - Make sure your terminal emulator of choice supports true colors.
- Using tmux? Configure it to add the
Tccapability.
A popular reference for colors in the terminal:
https://gist.github.com/XVilka/8346728
Tips
Go to other end of selected text
o and O in a visual selection make the cursor go to the other end. Try with
blockwise selection to see the difference. This is useful for quickly changing
the size of the selected text.
:h v_o
:h v_O
Saner behavior of n and N
The direction of n and N depends on whether / or ? was used for
searching forward or backward respectively. This is pretty confusing to me.
If you want n to always search forward and N backward, use this:
nnoremap <expr> n  'Nn'[v:searchforward]
xnoremap <expr> n  'Nn'[v:searchforward]
onoremap <expr> n  'Nn'[v:searchforward]

nnoremap <expr> N  'nN'[v:searchforward]
xnoremap <expr> N  'nN'[v:searchforward]
onoremap <expr> N  'nN'[v:searchforward]
Saner command-line history
If you’re anything like me, you’re used to going to next and previous items via
<c-n> and <c-p> respectively. By default, this also works in the
command-line and recalls older or more recent command-lines from history.
So far, so good. But <up> and <down> are even smarter! They recall the
command-line whose beginning matches the current command-line. E.g. :echo <up>
may change to :echo "Vim rocks!".
Of course, I don’t want you to reach to the arrow keys, just map it instead:
cnoremap <c-n>  <down>
cnoremap <c-p>  <up>
I depend on this behaviour several times a day.
Saner CTRL-L
By default, <c-l> clears and redraws the screen (like :redraw!). The
following mapping does the same, plus de-highlighting the matches found via /,
? etc., plus fixing syntax highlighting (sometimes Vim loses highlighting due
to complex highlighting rules), plus force updating the syntax highlighting in
diff mode:
nnoremap <leader>l :nohlsearch<cr>:diffupdate<cr>:syntax sync fromstart<cr><c-l>
Disable audible and visual bells
set noerrorbells
set novisualbell
set t_vb=
See Vim Wiki: Disable beeping.
Quickly move current line
Sometimes I need a quick way to move the current line above or below:
nnoremap [e  :<c-u>execute 'move -1-'. v:count1<cr>
nnoremap ]e  :<c-u>execute 'move +'. v:count1<cr>
These mappings also take a count, so 2]e moves the current line 2 lines below.
Quickly add empty lines
nnoremap [<space>  :<c-u>put! =repeat(nr2char(10), v:count1)<cr>'[
nnoremap ]<space>  :<c-u>put =repeat(nr2char(10), v:count1)<cr>
Now 5[<space> inserts 5 blank lines above the current line.
Quickly edit your macros
This is a real gem! The mapping takes a register (or * by default) and opens
it in the cmdline-window. Hit <cr> when you’re done editing for setting the
register.
I often use this to correct typos I did while recording a macro.
nnoremap <leader>m :<c-u><c-r><c-r>='let @'. v:register .' = '. string(getreg(v:register))<cr><c-f><left>
Use it like this <leader>m or "q<leader>m.
Notice the use of <c-r><c-r> to make sure that the <c-r> is inserted
literally. See :h c_^R^R.
Quickly jump to header or source file
This technique can probably be applied to many filetypes. It sets file marks
(see :h marks) when leaving a source or header file, so you can quickly jump
back to the last accessed one by using 'C or 'H (see :h 'A).
autocmd BufLeave *.{c,cpp} mark C
autocmd BufLeave *.h       mark H
NOTE: The info is saved in the viminfo file, so make sure that :set viminfo? includes :h viminfo-'.
Quickly change font size in GUI
I think this was taken from tpope’s config:
command! Bigger  :let &guifont = substitute(&guifont, '\d\+$', '\=submatch(0)+1', '')
command! Smaller :let &guifont = substitute(&guifont, '\d\+$', '\=submatch(0)-1', '')
Change cursor style dependent on mode
I like to use a block cursor in normal mode, i-beam cursor in insert mode, and
underline cursor in replace mode.
if empty($TMUX)
  let &t_SI = "\<Esc>]50;CursorShape=1\x7"
  let &t_EI = "\<Esc>]50;CursorShape=0\x7"
  let &t_SR = "\<Esc>]50;CursorShape=2\x7"
else
  let &t_SI = "\<Esc>Ptmux;\<Esc>\<Esc>]50;CursorShape=1\x7\<Esc>\\"
  let &t_EI = "\<Esc>Ptmux;\<Esc>\<Esc>]50;CursorShape=0\x7\<Esc>\\"
  let &t_SR = "\<Esc>Ptmux;\<Esc>\<Esc>]50;CursorShape=2\x7\<Esc>\\"
endif
This simply tells Vim to print a certain sequence of characters (escape
sequence) when entering/leaving
insert mode. The underlying terminal, or programs like
tmux that sit between Vim and the terminal, will
process and evaluate it.
There’s one drawback though: there are many terminal emulator implementations
and not all use the same sequences for doing the same things. The sequences used
above might not work with your implementation. Your implementation might not
even support different cursor styles. Check the documentation.
The example above works with iTerm2.
Don’t lose selection when shifting sidewards
If you select one or more lines, you can use < and > for shifting them
sidewards. Unfortunately you immediately lose the selection afterwards.
You can use gv to reselect the last selection (see :h gv), thus you can work
around it like this:
xnoremap <  <gv
xnoremap >  >gv
Now you can use >>>>> on your visual selection without any problems.
NOTE: The same can be achieved using ., which repeats the last change.
Reload a file on saving
Using autocmds you can do anything on saving a file, e.g. sourcing
it in case of a dotfile or running a linter to check for syntactical errors in
your source code.
autocmd BufWritePost $MYVIMRC source $MYVIMRC
autocmd BufWritePost ~/.Xdefaults call system('xrdb ~/.Xdefaults')
Smarter cursorline
I love the cursorline, but I only want to use it in the current window and not
when being in insert mode:
autocmd InsertLeave,WinEnter * set cursorline
autocmd InsertEnter,WinLeave * set nocursorline
Faster keyword completion
The keyword completion (<c-n>/<c-p>) tries completing whatever is listed in
the 'complete' option. By default, this also includes tags (which can be
annoying) and scanning all included files (which can be very slow). If you can
live without these things, disable them:
set complete-=i   " disable scanning included files
set complete-=t   " disable searching tags
Cosmetic changes to colorschemes
Always use a dark gray statusline, no matter what colorscheme is chosen:
autocmd ColorScheme * highlight StatusLine ctermbg=darkgray cterm=NONE guibg=darkgray gui=NONE
This triggers every time you use :colorscheme .... If you want it to trigger
only for a certain colorscheme:
autocmd ColorScheme desert highlight StatusLine ctermbg=darkgray cterm=NONE guibg=darkgray gui=NONE
This triggers only for :colorscheme desert.
Commands
Useful commands that are good to know. Use :h :<command name> to learn more
about them, e.g. :h :global.
:global and :vglobal
Execute a command on all matching lines. E.g. :global /regexp/ print will use
:print on all lines that contain “regexp”.
Fun fact: You probably all know good old grep, the filter program written by Ken
Thompson. What does it do? It prints all lines matching a certain regular
expression! Now guess the short form of :global /regexp/ print? That’s right!
It’s :g/re/p. Ken Thompson was inspired by vi’s :global when he wrote grep.
Despite its name, :global only acts on all lines by default, but it also takes
a range. Assume you want use :delete on all lines from the current line to the
next blank line (matched by the regular expression ^$) that contain “foo”:
:,/^$/g/foo/d
For executing commands on all lines that do not match a given pattern, use
:global! or its alias :vglobal (think inVerse) instead.
:normal and :execute
These commands are commonly used in Vim scripts.
With :normal you can do normal mode mappings from the command-line. E.g.
:normal! 4j will make the cursor go down 4 lines (without using any custom
mapping for “j” due to the “!”).
Mind that :normal also takes a range, so :%norm! Iabc would
prepend “abc” to every line.
With :execute you can mix commands with expressions. Assume you edit a C
source file and want to switch to its header file:
:execute 'edit' fnamemodify(expand('%'), ':r') . '.h'
Both commands are often used together. Assume you want to make the cursor go
down “n” lines:
:let n = 4
:execute 'normal!' n . 'j'
:redir and execute()
Many commands print messages and :redir allows to redirect that output. You
can redirect to files, registers or variables.
:redir => var
:reg
:redir END
:echo var
:" For fun let's also put it onto the current buffer.
:put =var
In Vim 8 there is an even shorter way:
:put =execute('reg')
Help:
:h :redir
:h execute()
Debugging
General tips
If you encounter a strange behaviour, try reproducing it like this:
vim -u NONE -N
This will start Vim without vimrc (thus default settings) and in nocompatible
mode (which makes it use Vim defaults instead of vi defaults). (See :h --noplugin for other combinations of what to load at start.)
If you can still reproduce it now, it’s most likely a bug in Vim itself! Report
it to the vim_dev mailing
list. Most of the time the issue won’t be resolved at this time and you’ll have
to further investigate.
Plugins often introduce new/changed/faulty behaviour. E.g. if it happens on
saving, check :verb au BufWritePost to get a list of potential culprits.
If you’re using a plugin manager, comment them out until you find the culprit.
Issue is still not resolved? If it’s not a plugin, it must be your other
settings, so maybe your options or autocmds etc.
Time to use binary search. Repeatedly split the search space in two until you
find the culprit line. Due to the nature of binary division, it won’t take many
steps.
In practice, it works like this: Put the :finish command in the middle of your
vimrc. Vim will skip everything after it. If it still happens, the problem is in
the active upper half. Move the :finish to the middle of that half.
Otherwise, the issue is in the inactive lower half. Move the :finish to the
middle of that half. And so on.
Verbosity
Another useful way for observing what Vim is currently doing is increasing the
verbosity level. Currently Vim supports 9 different levels. See :h 'verbose'
for the full list.
:e /tmp/foo
:set verbose=2
:w
:set verbose=0
This would show all the files that get sourced, e.g. the undo file or various
plugins that act on saving.
If you only want increase verbosity for a single command, there’s also
:verbose, which simply gets put in front of any other command. It takes the
verbosity level as count and defaults to 1:
:verb set verbose
"  verbose=1
:10verb set verbose
"  verbose=10
It’s very often used with its default verbosity level 1 to show where an option
was set last:
:verb set ai?
"      Last set from ~/.vim/vimrc
Naturally, the higher the verbosity level the more overwhelming the output. But
fear no more, you can simply redirect the output to a file:
:set verbosefile=/tmp/foo | 15verbose echo "foo" | vsplit /tmp/foo
You can also enable verbosity at starting time, with the -V option. It
defaults to verbosity level 10. E.g. vim -V5.
Profiling startup time
Vim startup feels slow? Time to crunch some numbers:
vim --startuptime /tmp/startup.log +q && vim /tmp/startup.log
The first column is the most important as it shows the elapsed absolute time. If
there is a big jump in time between two lines, the second line is either a very
big file or a file with faulty VimL code that is worth investigating.
Profiling at runtime
Required feature: +profile
Vim provides a built-in capability for profiling at runtime and is a great way
to find slow code in your environment.
The :profile command takes a bunch of sub-commands for specifying what to
profile.
If you want to profile everything, do this:
:profile start /tmp/profile.log
:profile file *
:profile func *
<do something in Vim>
<quit Vim>
Vim keeps the profiling information in memory and only writes it out to the
logfile on exit. (Neovim has fixed this using :profile dump).
Have a look at /tmp/profile.log. All code that was executed during profiling
will be shown. Every line, how often it was executed and how much time it took.
Most of the time that will be plugin code the user isn’t familiar with, but if
you’re investigating a certain issue, jump to the bottom of the log. Here are
two different sections FUNCTIONS SORTED ON TOTAL TIME and FUNCTIONS SORTED ON SELF TIME that are worth gold. At a quick glance you can see, if a certain
function is taking too long.
Debugging Vim scripts
If you ever used a command-line debugger before, :debug will quickly feel
familiar.
Simply prepend :debug to any other command and you’ll be put into debug mode.
That is, the execution will stop at the first line about to be executed and that
line will be displayed.
See :h >cont and below for the 6 available debugger commands and note that,
like in gdb and similar debuggers, you can also use their short forms: c, q,
n, s, i, and f.
Apart from that those, you’re free to use any Vim command, e.g. :echo myvar,
which gets executed in the context of the current position in the code.
You basically get a
REPL by
simply using :debug 1.
It would be a pain if you had to single-step through every single line, so of
course we can define breakpoints, too. (Breakpoints are called breakpoints,
because the execution stops when they’re hit, thus you can simply skip code
you’re not interested in.) See :h :breakadd, :h :breakdel, and :h :breaklist for further details.
Let’s assume you want to know what code is run every time you save a file:
:au BufWritePost
" signify  BufWritePost
"     *         call sy#start()
:breakadd func *start
:w
" Breakpoint in "sy#start" line 1
" Entering Debug mode.  Type "cont" to continue.
" function sy#start
" line 1: if g:signify_locked
>s
" function sy#start
" line 3: endif
>
" function sy#start
" line 5: let sy_path = resolve(expand('%:p'))
>q
:breakdel *
As you can see, using <cr> will repeat the previous debugger command, s in
this case.
:debug can be used in combination with the verbose option.
Debugging syntax files
Syntax files are often the cause for slowdowns due to wrong and/or complex
regular expressions. If the +profile feature
is compiled in, Vim provides the super useful :syntime command.
:syntime on
" hit <c-l> a few times to redraw the window which causes the syntax rules to get applied again
:syntime off
:syntime report
The output contains important metrics. E.g. you can see which regexp takes too
long and should be optimized or which regexps are used all the time but never
even match.
See :h :syntime.
Miscellaneous
Additional resources
| Resource | Description |
|---|---|
| Seven habits of effective text editing | By Bram Moolenaar, the author of Vim. |
| Seven habits of effective text editing 2.0 (PDF) | See above. |
| IBM DeveloperWorks: Scripting the Vim editor | Five-part series on Vim scripting. |
| Learn Vimscript the Hard Way | Develop a Vim plugin from scratch. |
| Practical Vim (2nd Edition) | Hands down the best book about Vim. |
| Why, oh WHY, do those #?@! nutheads use vi? | Common misconceptions explained. |
| Your problem with Vim is that you don’t grok vi | Concise, informative and correct. A real gem. |
Screencasts
Vim distributions
Vim distributions are bundles of custom settings and plugins for Vim.
More advanced users know how to configure their editor anyway, so distributions
are mostly targeted at beginners. If you think about that, it’s quite
paradoxical though: Making it easier by adding even more things to learn about?
I know that many people don’t want to spend hours and hours on customizing an
editor (and actually you never stop customizing your vimrc when you finally got
hooked), but eventually you only get efficient in Vim when you take the time to
learn it properly.
Repeat after me: “A programmer should know their tools.”
Anyway, if you know what you’re doing, you might draw some inspiration from
looking at a few distributions:
Standard plugins
Many people are surprised by the fact that Vim comes with a handful of standard
plugins. Some get loaded by default (:e $VIMRUNTIME/plugin) and some are not
(:e $VIMRUNTIME/pack/dist/opt). Read :h pack-add on how to source the
latter.
Most of the plugins that get loaded by default will never get used, though.
Disable them as you see fit. They will still be shown as sourced
(:scriptnames), but only the first lines actually get read before Vim bails
out. No further code (mappings, commands, logic) will be processed.
| Plugin | Disable it using… | Help |
|---|---|---|
| 2html | let g:loaded_2html_plugin = 1 |
:h 2html |
| getscript | let g:loaded_getscriptPlugin = 1 |
:h pi_getscript |
| gzip | let g:loaded_gzip = 1 |
:h pi_gzip |
| logipat | let g:loaded_logipat = 1 |
:h pi_logipat |
| matchparen | let g:loaded_matchparen = 1 |
:h pi_paren |
| netrw | let g:loaded_netrwPlugin = 1 |
:h pi_netrw |
| rrhelper | let g:loaded_rrhelper = 1 |
:e $VIMRUNTIME/plugin/rrhelper.vim |
| spellfile | let g:loaded_spellfile_plugin = 1 |
:h spellfile.vim |
| tar | let g:loaded_tarPlugin = 1 |
:h pi_tar |
| vimball | let g:loaded_vimballPlugin = 1 |
:h pi_vimball |
| zip | let g:loaded_zipPlugin = 1 |
:h pi_zip |
Map CapsLock to Control
CapsLock belongs to the most useless keys on your keyboard, but it’s much easier
to reach than the Control key, since it lies on your home
row.
Mapping CapsLock to Control is a great way to prevent or at least reduce
RSI if you
program a lot.
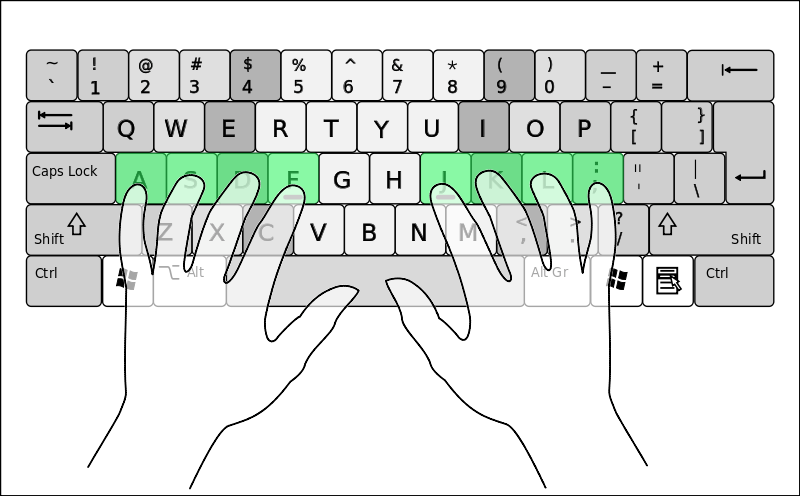
Attention: When you get used to it, you can’t live without it anymore.
macOS:
System Preferences -> Keyboard -> Keyboard Tab -> Modifier Keys. Change
“CapsLock” to “Control”.
Linux:
To change the keys in X, put this in your ~/.xmodmap:
remove Lock = Caps_Lock
keysym Caps_Lock = Control_L
add Control = Control_L
Afterwards source it via $ xmodmap ~/.xmodmap.
An alternative would be using caps2esc or
xcape.
Windows:
See superuser.com: Map Caps-Lock to Control in Windows
8.1.
Generating HTML from buffer
Generate HTML from any buffer using :TOhtml from the 2html standard
plugin. The output can be used for printing or easy web
publishing.
The command creates a new buffer of the same name with .html appended. The
colors are the same as seen in Vim. They depend on the
colorscheme.
The plugin knows several options to finetune the output, e.g. for setting the
encoding and font.
See :h :TOhtml.
Easter eggs
| Command | Message |
|---|---|
:Ni! |
Do you demand a shrubbery? |
:h 'sm' |
NOTE: Use of the short form is rated PG. |
:h 42 |
What is the meaning of life, the universe and everything? Douglas Adams, the only person who knew what this question really was about is now dead, unfortunately. So now you might wonder what the meaning of death is... |
:h UserGettingBored |
When the user presses the same key 42 times. Just kidding! :-) |
:h bar |
Ceci n'est pas une pipe. |
:h holy-grail |
You found it, Arthur! |
:h map-modes |
:nunmap can also be used outside of a monastery. |
:help! |
E478: Don't panic! (Glitch? When used in a help buffer (buftype=help) this works like :h help.txt instead.) |
:smile |
Try it out yourself. ;-) Added in 7.4.1005. |
Why hjkl for navigation?
When Bill Joy created
vi, a predecessor of Vim, he did it on a
ADM-3A which had no extra cursor buttons
but used, you might already guessed it, hjkl instead.
Keyboard layout: click
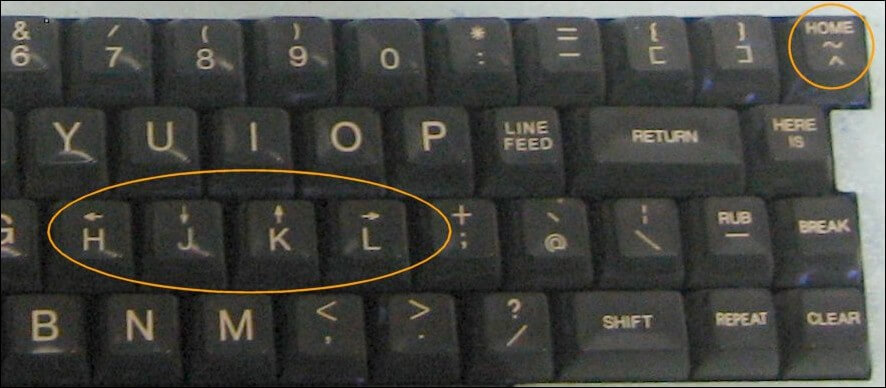
This also shows why ~ is used to denote the home directory on Unix systems.
Common problems
Editing small files is slow
There are two things which can have a huge impact on performance:
- Complex regular expressions. Particular the Ruby syntax file caused
people to have slowdowns in the past. (Also see Debugging syntax files.) - Screen redraws. Some features force all lines to redraw.
| Typical culprit | Why? | Solution? |
|---|---|---|
:set cursorline |
Causes all lines to redraw. | :set nocursorline |
:set cursorcolumn |
Causes all lines to redraw. | :set nocursorcolumn |
:set relativenumber |
Causes all lines to redraw. | :set norelativenumber |
:set foldmethod=syntax |
If the syntax file is slow already, this makes it even worse. | :set foldmethod=manual, :set foldmethod=marker or FastFold |
:set synmaxcol=3000 |
Due to internal representation, Vim has problems with long lines in general. Highlights columns till column 3000. | :set synmaxcol=200 |
| matchparen.vim | Loaded by default. Uses regular expressions to find the accompanying parenthesis. | Disable plugin: :h matchparen |
NOTE: You only need to do this if you experience actual performance
drawbacks. In most cases using the things mentioned above is absolutely fine.
Editing huge files is slow
The biggest issue with big files is, that Vim reads the whole file at once. This
is done due to how buffers are represented internally.
(Discussion on vim_dev@)
If you only want to read, tail hugefile | vim - is a good workaround.
If you can live without syntax, settings and plugins for the moment:
$ vim -u NONE -N
This should make navigation quite a lot faster, especially since no expensive
regular expressions for syntax highlighting are used. You should also tell Vim
not to use swapfiles and viminfo files to avoid long delays on writing:
$ vim -n -u NONE -i NONE -N
Putting it in a nutshell, try to avoid using Vim when intending to write really
huge files. :\
Bracketed paste (or why do I have to set ‘paste’ all the time?)
Bracketed paste mode allows terminal emulators to distinguish between typed text
and pasted text.
Did you ever tried pasting code into Vim and afterwards everything seemed messed
up?
This only happens if you paste via cmd+v, shift-insert, middle-click etc.
because then you’re just throwing text at the terminal emulator. Vim doesn’t
know that you just pasted the text, it thinks you’re an extremely fast typist.
Accordingly, it tries to indent the lines and fails.
Obviously this is not an issue, if you paste using Vim’s registers, e.g. "+p,
because then Vim knows that you’re actually pasting.
To workaround this, you have to :set paste, so it gets pasted as-is. See :h 'paste' and :h 'pastetoggle'.
If you’re fed up with toggling 'paste' all the time, have a look at this fine
plugin that does it for you:
bracketed-paste.
Additional read from the same author as the plugin:
here.
Neovim: Neovim tries to make all of this much more seamless and sets
bracketed paste mode automatically if the terminal emulator supports it.
Delays when using escape key in terminal
If you live in the command-line, you probably use a so-called terminal
emulator like xterm, gnome-terminal, iTerm2, etc. (opposed to a real
terminal).
Like their ancestors, terminal emulators use escape
sequences (or control
sequences) to control things like moving the cursor, changing text colors, etc.
They’re simply strings of ASCII characters starting with an escape character
(displayed in caret notation as
^[). When such a string arrives, the terminal emulator looks up the
accompanying action in the terminfo
database.
To make the problem clearer, I’ll explain mapping timeouts first. They always
happen when there’s ambiguity between mappings:
:nnoremap ,a  :echo 'foo'<cr>
:nnoremap ,ab :echo 'bar'<cr>
Both mappings work as expected, but when typing ,a, there will be a delay of 1
second, because Vim waits whether the user keys in another b or not.
Escape sequences pose the same problem:
<esc>is used a lot for returning to normal mode or quitting an action.- Cursor keys are encoded using escape sequences.
- Vim expects Alt (also called Meta key) to send a proper 8-bit
encoding with the high bit set, but many terminal emulators don’t support it
(or don’t enable it by default) and send an escape sequence instead.
You can test the above like this: vim -u NONE -N and type i<c-v><left> and
you’ll see a sequence inserted that starts with ^[ which denotes the escape
character.
Putting it in a nutshell, Vim has a hard time distinguishing between a typed
<esc> character and a proper escape sequence.
By default, Vim uses :set timeout timeoutlen=1000, so it delays on ambiguity
of mappings and key codes by 1 second. This is a sane value for mappings, but
you can define the key code timeout on its own which is the most common
workaround for this entire issue:
set timeout           " for mappings
set timeoutlen=1000   " default value
set ttimeout          " for key codes
set ttimeoutlen=10    " unnoticeable small value
Under :h ttimeout you find a small table showing the relationship between
these options.
If you’re using tmux between Vim and your terminal emulator, also put this in
your ~/.tmux.conf:
set -sg escape-time 0
Function search undo
- A search pattern in a command (
/,:substitute, …) changes the “last used
search pattern”. (It’s saved in the/register; print it with:echo @/). - A simple text change can be redone with
.. (It’s saved in the.register;
print it with:echo @.).
Both things are not the case, if you do them from a function, though! Thus you
can’t easily highlight words from a function or redo the text changes made by
it.
Help: :h function-search-undo
Technical quirks
Newline used for NUL
NUL characters (\0) in a file, are stored as newline (\n) in memory and
displayed in a buffer as ^@.
See man 7 ascii and :h NL-used-for-Nul for more information.